A Happy New Year to everyone and Welcome to my first Blog of 2007.

If you've read my previous blogs about Puya Alpestris and Aloe Striatula, you'll see that both are planted out in gravel beds.
Originally, I made these beds to provided a home for many of my alpine plants.
As luck would have it, their south facing position and very fast drainage has proved ideal for growing Mediterranean type plants which require these type of conditions.
So, for gardeners who fancy a bit of mind broadening and moderately hard work for the New Year, here's how I made mine. ( It's easy, Honest! )
First thing to do, is to pick a site, my beds face almost due south and they're open to all that the weather can throw at them.
If you can pick a south to west facing site, perhaps close to a wall or something that gives a bit of protection from the elements, then this would be even better.
You don't need much in the way of materials, pea gravel, something to edge the bed with and some well rotted manure. ( optional )
Now for the work.
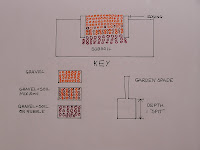
First, mark out your site and dig out the soil one spit deep, the soil should be placed to one side.
You'll only need a small amount of this soil, so the rest can be spread over the garden.
Thoroughly break up the soil in the bottom of the hole, digging in some of the gravel as you're doing it.
Any clay lumps should be removed and if there's a hard pan, as much of it as possible should be broken up.
You can now put in the edging material making sure its above the soil level.
Next take some of the soil you've put to one side and mix it with the gravel ( and manure if you wish ) at a ratio of 2 parts gravel to 1 part soil.
Fill the hole with the mixture to between 4/6 inches from the top, blending it a little with the soil below.
Finally, blend in some of the pea gravel into the previous layer and top it off with just the pea gravel.
The final layer of gravel should be a minimum of 4ins. deep.
Allow the soil to settle for a couple of weeks before planting up.
This is a very basic bed that works well on my clay soil but there are as they say, "variations on a theme" so here's a couple or three.
By raising the overall height of the edging, a raised bed proper can be made, this makes it easier for someone less mobile to be able to enjoy gardening.
For super, superfast drainage, builders rubble can be used to replace the bottom soil.
For those with an artistic bent, you can create a mini landscape by part burying various size stones or rocks in the top layer of gravel.
By using small or slow growing xeric plants some very nice effects can be created using this method.
The only fly in the ointment is winter wet and like it or not, there are many xeric plants which have a very low tolerance to getting a soaking at this time of year.
Remember, many of these plants may experience frost in their natural habitat but in this case, winters tend to be dry cold not damp or wet like ours.
Some plants, such A.Striatula and P.Alpestris take it in their stride, others such as members of the Agave clan can be badly affected.
Fortunately, its easy to provide some protection from the more inclement weather.
For those who can provide the protection of a wall, then the easiest way to protect the plants is to prop old window frames ( in case anyone asks, complete with the glass ) at an angle against the wall and the front edge of the bed forming a kind of tent structure.
These can be removed for the summer and stored somwhere out of the way.
With beds like mine which are in an exposed position, you have to call on your diy skills.
A hooped frame, ( like plastic greenhouses ) can be made out of the plastic tubing which is used for water overflows. ( toilet, sinks etc. )
This is then covered with clear plastic sheet which is pegged into the ground but leaving a gap at the bottom to allow air to circulate.
Although these modifications work, in that they keep the rain off, they can never take the place of the previously mentioned dry winters.
Condensation, especially with the plastic is still likely to pose some problems and only you can decide if its worth while. Posted by: Mike.


