


The history of Cycads stretches back over millions of years, with various aspects of it still the subject of much debate.
Cycad fossil's, have been recovered from from almost every corner of the modern day world and when dated, many have been shown to be between 250 and 280 million years old.
At their Zenith during the Jurassic Period, when they all but dominated the vegetation, various factors combined which saw the beginning of their decline.
Today there are some 250 species left and many, if not the majority of these are threatened with extinction.
I'm not a particularly "Green" kind of bloke, but I think it would be a great tragedy if these magnificent and fascinating plants were to disappear forever.
Let's hope that something can be done to secure their future.
Native to the Ruyukyu Islands of Japan, Cycas Revoluta has been cultivated for centuries, being a much revered plant in its homeland.
From here, it has spread throughout the World and wherever Cycads can be grown you'll find C.Revoluta somewhere, either as a houseplant, landscape plant or even as a subject for Bonsai.
One thing does puzzle me though.
When you consider, the many thousands of plants that are raised each year for the U.K. market alone, where does all the seed come from?
Despite its reputation for being an easy to grow plant, it wasn't until I'd got to grips with the watering, that I had any sort of success and this was usually short lived.
Rotting roots were the main problems, causing me to lose several plants.
Whenever I repotted one, it invariably went into a massive sulk, lasting anything up to a year or two or three.
So, some three years ago, I abandoned growing them in pots in favour of planting them out in the garden.
For those with masochistic tendencies or are members of the "Greenfinger" club I offer these tips, based on my experiences.
C.Revoluta is very sensitive to over watering, particularly in winter.
You must ensure that drainage in your pot is first class, anything less will invariably result in the roots rotting.
Allow the plant to dry out between watering, don't do my trick, "a little bit more wont hurt" it does, keep it on the dry side!
If you do repot your plant, ( you brave soul! ) a good compost can be made up using J.I.No2/3, Coir, well rotted manure and orchid bark chips or Perlite.
I used 1 part each of J.I, Coir and manure mixed with a generous 2 parts orchid bark chips or Perlite and long life fertilizer.
I also added charcoal pieces to the mixture as this helps to keep the compost sweet.
This gives a fast draining, aerated mixture which should hold just enough moisture to keep the plant happy.
Ive actually tried, to grow C.Revoluta in the garden on several occasions in the past but without much success.
Rotting at the base of the plants and the roots being the cause of their demise.
Three years ago, after abandoning trying to grow them in pots I decided to have one last go at growing them in the garden.
So in Spring 2003 I planted three out in the garden.
(There's one thing I should point out.
When I first tried them out in the garden, I planted part of the stem as well.
Big mistake!
Moisture gets trapped in the old leaf stalks and this, I believe is what caused the base of the plant to rot.
Only plant the roots, leave the stem resting on the surface.)
One, is planted in a shady south facing spot in the front garden.
In 2004 it grew three leaves which have since gone into decline and its done nothing since.
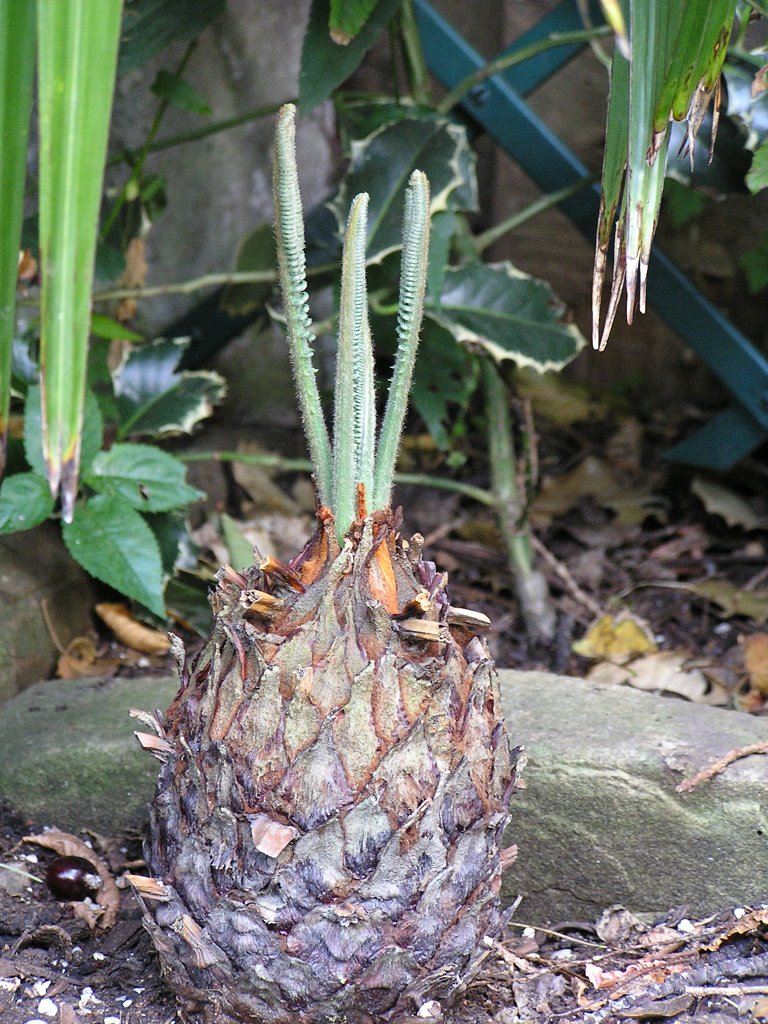
Another one, ( pictured ) I've planted in the back garden.
This one lives in a south west facing raised bed and it's lightly shaded by a Lilac tree and the overhanging fronds of a small T.Fortunii.
Without the shading, it would get full sun from 1pm. until sunset.
I built this bed some eight years ago, it's very fast draining and it dries out quickly.
The final one is also in the back garden.
This one however, is planted in a border, in a north facing spot, some 10ins away from a wall.
This one, only gets the final rays of the sun, from about 5pm. to sunset.
This year, in the middle of June, both these plants began to grow new leaves.
As can be seen from the photo, taken on the 15th July they're not large but at least they're a start.
Am I pleased? You bet I am.
I'm watering and feeding them well and the plants look a picture of health, I just hope they make it through the coming winter o.k. Posted by:Mike.
Note This has been a long Blog and there is a great deal more that I could add, space however is at a premium.
I've kept a lot of notes ocncerning the growing of C.Revoluta, so if I can be of any help, please get in touch.
There's a moral ( Moral no.1. ) in this blog, which goes something like this.
Don't dig up any plant and discard it until you're absolutely, 100%, sure it's dead!
In my blog "2005 Winter Summary" I noted that M.Sikkimensis looked as though it had passed on to greener pastures.
In fact, I was so convinced of it's demise, that I'd decided to dig it up and dump it.
Fate, in the shape of other jobs taking priority took a hand and the seemingly soggy mess was still in the ground in mid Spring.
I should say here, that I mulch the roots heavily to provide Winter protection but I leave the stems unprotected. The soggy mess was all that was left of the stems.
One evening in late May, while taking a stroll round my acres, I noticed a shoot poking it's head through the mulch.
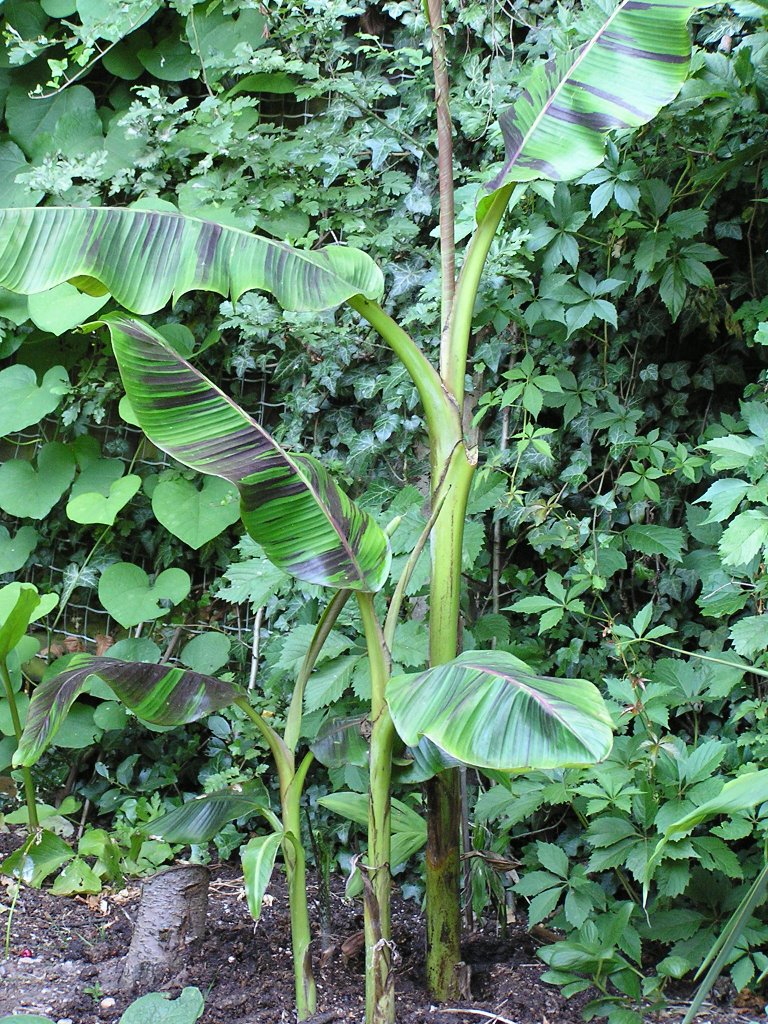
Lo and behold, it was M.Sikkimensis back from the dead!
As the day's past, another couple of shoot's appeared. Oh joy and all that stuff, a miracle no less.
As can be seen from the pic, M.Sikkimensis is now growing away strongly and hopefully will continue to do so for years to come.
There's another moral in this story, ( Moral No.2. ) which I'll now tell you.
Originaly, I bought two M.Sikkimensis in the Spring sale from an exotic plant nursery.
I planted one out in the garden and grew the other one on in a pot.
As the Winter drew ever closer, I wondered what to do with regards to giving the Musa I'd planted out some Winter protection.
As it happened, I came across the website of someone who's an expert in these things.
He recommended putting wire mesh around the stems, filling it with straw and putting a cap on top to keep out excess rain.
So, that's what I did.
Come the following Spring, I removed the straw and mesh expecting to find my Musa in fine fettle and raring to grow.
No such luck!
All that was left was a smelly mess of soggy brown gunge and this included the root system.
An e.mail to the expert, asking him where he thought I might have gone wrong, bought the reply and I quote "Sorry I don't know, I've lost one of my plants that way as well".
The moral is, "Beware of Experts" keep an open mind, use your own judgment, try to experiment and remember, what works in someone elses garden might not work in yours.
Seriously though, M.Sikkimensis is an excellent plant needing only sun, a rich soil, lots of water and fertilizer to keep it happy.
Wind can be a problem, causing the the leaves to split but I've never had any problems with pests on it.
A very nice plant and root hardy down to minus 10c. Posted by: Mike

There are some palms, which I describe as "mystery" palms.
The reason for this, is because it's a mystery to me why no one here in the U.K. seems to grow them.
Although I've looked at various forums and the odd personal website, I've never seen C. Microspadix mentioned anywhere.
Whether people are growing it and keeping quiet about it for some reason I don't know. Perhaps they prefer the more "Glamorous" palms
One thing is certain though, if you're not growing it, you're missing out on a great palm.
C.Microspadix, hails from forested areas of central Mexico and has turned out to be one of the hardiest palms that I grow.
When I bought my plant, it was a tiny little thing and for a couple of years I grew it as a houseplant.
Although it looked good grown in a pot, I found that I was fighting a losing battle against Red Spider Mite.
More in desperation than hope, I decided to take the plunge and plant it out.
So, some four years ago, I planted it out in a shady spot in the garden.
Although it still suffers from the occasional attack by the dreaded Mite it's turned out to be a really good garden palm.
A worthy addition to any collection.
Growing C.Microspadix is easy, it does best in rich well drained soil in light to medium shade.
For planting in the garden, use your favourite method or see my blog titled "Planting Out Your Treasures".
If you're using a plastic pot, add more drainage material.
C.Microspadix doesn't seem to be fussy about compost, so as long as it's well drained you can use anything really.
I made one up using 1 part J.I.no2, 1 part soilless, 1 part coir and 2 parts small bark chips, plus long life fertilizer.
Whether, planted out, or grown in a pot, keep it well watered and fertilized during growth.
Keep the pot just moist in winter.
C.Microspadix is one of those palms which look good in a pot or in the garden.
Provided you keep your eye open for Spider Mite, which seems to be its greatest enemy, you should have little trouble with it.
All in all, a great palm. Posted by:Mike.
Note: For a more comprehensive explanation of how I plant my palms, see my June blog:
Allthough Agave species are easy to grow from seed, problems arise when you want to propagate the variegated forms. These must be propagated from offsets or runners.
One of the most popular, is A.Americana Variegata, which in common with other forms of A.Americana usually puts out plenty of offsets.
Starting with the equipment needed, here's how to propagate them.
You need a very sharp knife, scalpel or a pair of secateurs.
Some fungicide such as sulpher dust and of course pots, compost and gravel.
I also use surgical spirit to sterilize the cutting tools.
Cleanliness is most important to prevent infections.
Make sure the area where you're working is clean and knock the plant out of the pot.
Carefully clean away as much of the soil as possible, to expose the roots.
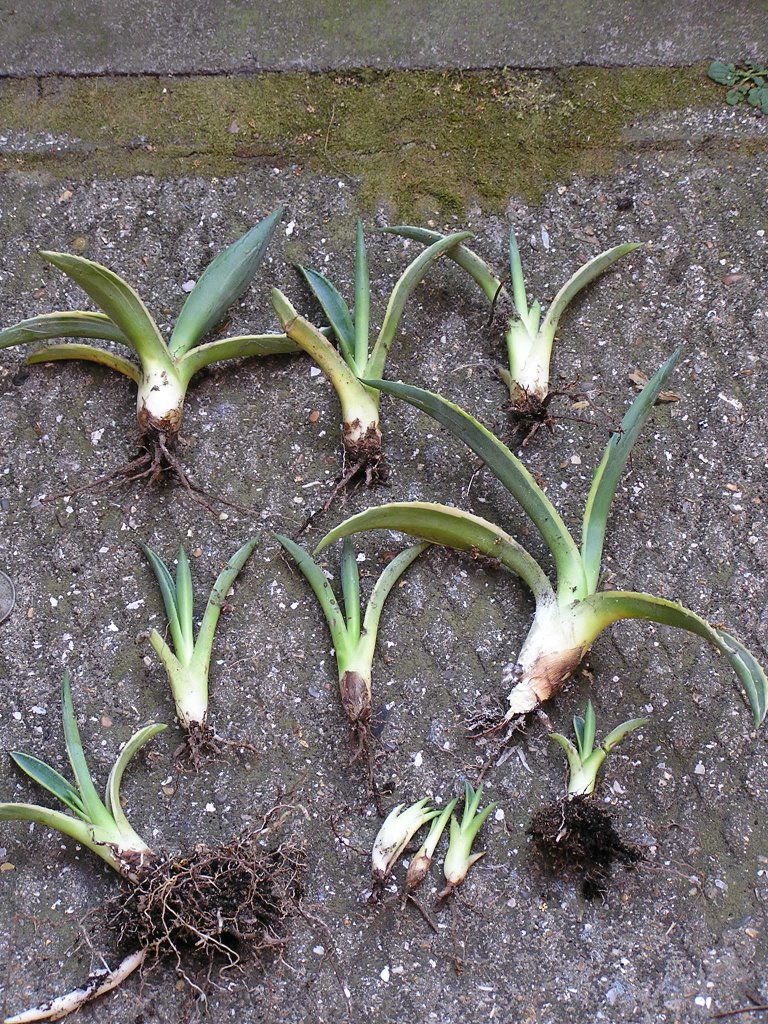
If your plant has been in the pot for sometime, you may well find three types of offset. ( See photo. )
The oldest offsets, will usually have a complete root system of their own.
These are easy to tease out and remove from the parent plant.
The next type, are those with a partial root system and are still connected to the main plant.
These offsets should be carefully cut away, with as much root as possible and the cuts dusted with fungicide.
The final type ( the youngest ) usually have few, if any roots and should be treated as cuttings.
Dust all cuts with fungicide and place them in a tray.
Leave the tray in a warm, shady spot for a day or so to allow the cuts to callous over.
Replant the parent plant in very well drained compost and leave in a shady spot for a few days.
I don't water the offsets or the parent plant for a few days and when I do I only just moisten the soil.
When the cuts on the offsets have calloused over, I repot them into a very well drained mix of J.I. seed or No1 compost.
When repotting the offsets, use the smallest pots you can, you don't need acres of soggy soil around them.
If you repot into plastic pots, add extra drainage to be on the safe side.
You can also use soilless compost but watch the moisture level, Moist not Wet
I leave them in a light airy spot while the new roots are growing and I watch the watering!
Propagating from offsets is easy as long as you remember to keep things clean and use a bit of care.
Don't allow your plant to become too overgrown in its pot before you do this, once you see three or four offsets growing take them off, it makes life a lot easier.
If your plant grows in the ground, the procedure is just the same.
If the plant has its own root system. lift it as normal, with a good rootball if possible.
If it's still connected to the main plant, proceed as above. Posted by : Mike.
Note: Try to water your plant, a few hours, or even better the night before you propagate from it.
Try to take the offsets in the morning, before the heat of the day makes itself felt.
Just doing both these, will help to limit moisture loss.
Remember, your offsets have to form new roots before they can take up moisture and nutrients and until they do, they have to exist on their own reserve's.

Aloes, have been grown as house plant's for years, with A.Vera the "Medicinal Aloe" probably being the most well known.
Usually regarded as half hardy or tender plants, here's one which breaks all the rules. Meet Aloe Striatula.
A native of South Africa, given the right conditions, A.Striatula will brush off anything our winters can throw at it and come up smiling in the spring.
So, if you've a passion for Mediterranean plants or just fancy something different give A.Striatula a try, you'll not be disappointed.
Growing A. Striatula is easy, its main requirements are, lots of sun and very well drained soil.
A.Striatula is best planted in a south facing position, give it as much sun as you can. Drainage should be first class, with no possibility of standing water. This is critical in winter. ( Mine grows in a south facing gravel bed with no winter protection. ) It's best planted out after all danger of frost has gone.
Water well during summer to get it established, then ease off for the autumn and winter.
Once established, A.Striatula is as drought resistant as they come and needs very little in the way of maintenance. I give my plant a few dose's of tomato fertilizer during the summer and that's it.
A Striatula also looks good in pots but beware, it tends to grow up and out like a shrub so, when large it all gets a bit heavy and awkward.
There's no need for any fancy composts, a one to one or even one to two mix of JI.no 2 or 3 and gravel will suffice. Whatever compost you use, err on the side of fast drainage and top off the pot with a good gravel mulch.
I'll be doing a blog on growing xeric plants from seed in the near future and this will include Aloes.
It's possible to grow A.Striatula from cuttings but great care is needed as any excess moisture will cause them to rot.
I used some new side shoots, about an inch and a half long for propagation, cutting them off close to the main stem.
I dusted them with sulpher powder and left them out for a couple of days to callous over.
I potted them up in a mix of J.I. seed compost and gravel, keeping them just moist.
After about six weeks, three cuttings had rooted and one rotted off.
If you're going to try propagating from cuttings, you must avoid excess humidity as it will kill your plants quicker than anything. Posted by: Mike.
A.Striatula really is a superb plant for the exotic garden. I've had little trouble with pests, other than ants which feed on the nectar rich flowers with relish. On occasions blackfly will feed on the flower stems and the odd slug has a nibble but nothing to get excited about.
Frost usually nips the leaf tips, turning them a tad brown, but as the plant starts back into growth this seems to disappear. All in all, a great plant.