This blog, to which I'll be adding to from time to time is made up of tips, observations and general gardening info which I hope will be of use to the newcomer. To start the ball rolling though, I'll begin with a popular myth.
 I very much doubt if there's a gardener in the land, possibly the World who hasn't heard an expert say "If you want to deter Slugs and Snails then put down a layer of gravel" or it could well be eggshells, bark chips or some magic potion.
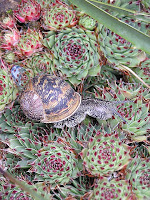
Well my friends, look at the photo and you will see in glorious colour, irrefutable proof that gravel does not deter Slugs and Snails and if you look at the photo below, you'll see that plants with sharp spines don't deter them either.
As you can see, this little fella on the left, was on his way to dine on one of the remnants of my alpine plant collection while his chum was passing through.
Needless to say, after I took the pictures they were on their way, winging it through the stratosphere to places anew.
 Let me assure you, that in all the years I've been gardening, I've never known gravel to deter Slugs or anything else. (Human intruders excepted)
You have only to look at a Slug or Snail to realize that they're ideally suited to moving over gravel or anything else that nature or humans put in their way.
After all, the slimy trail they leave behind isn't just for show or to make us go URGH!
It gives protection to the "foot", acts as a means of travelling from A to B and when it's finished dining on your choice plants, provides it with a trail to follow back home to that lovely cool, moist, bark chip mulch that you've provided for them to live in.
So fellow gardeners, forget gravel, bark chips, eggshells, beer traps (much better if you drink it) and dancing around naked by the light of a full Moon casting spells, stick to the traditional ways.
Namely, a dose of salt, creeping around in the middle of the night with a sharp knitting needle, the heel of a boot squash (also good for vine weevils) or the traditional slug pellet.
 The photo left shows some items that are easily made and hopefully, you might find to be very useful.
(If they look brand-new, that’s because I made new ones especially for the photo, no mucky pictures on my Blog.)
The two items on the left are scoops made from plastic bottles.
The first of these is made from a bottle that once held “Radox” bath foam.
This is useful for measuring the ingredients of a compost mix, so one full scoop equals one part of the mix.
The centre scoop is made from an empty “pop” bottle; those with straight sides are the best to use.
I use these for repotting especially with plants like Agaves which have sharp spiny leaves.
If you part fill the scoop with compost mix then gently squeeze the open end partialy together, you’ll find that you can accurately pour the compost between the inside of the pot and the plant root ball, no more spilling compost everywhere.
The third item on the right is a seed washer or colander.
I’ve always grown plants from seed and apart from hardy annuals and dust like seed such as Begonias I always give the seeds a good soaking.
This can be anything from 48hrs to a week.
Every twenty four hours, I decant the seeds into the washer and hold them for a minute or two under a gently flowing tap.
This washes away any chemical inhibitors that have leached out of the seed.
I can then plant them up or put them in another container for more soaking.
 I'm the first to admit that my d.i.y. projects leave a lot to be desired.
I'm terrible at hanging wallpaper and don't even mention woodworking projects. (Except this one it's easy.)
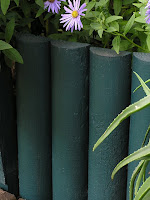
Despite these minor setbacks, I do have the occasional success and making log roll is one of them.
Like many gardeners, I've used log roll for edging and the occasional raised bed but I've found that the roll that's available commercially, is pretty dissapointing stuff.
For starters, you're usually limited to three widths 6, 9 and 12inch.
The 6inch makes good firewood, the 9inch makes passable edging, while the 12inch is bit too wide for edging but not quite wide enough enough to make a decent depth raised bed.
I've also found that although the roll is usually treated with wood preservative, it really isn't up to much.
Some roll that I've used started to split and rot after only two years use. Very poor!
So what's the answer? I hear you all ask.
Easy really; make your own!
I should say here, that I doubt if making your own will work out any cheaper than buying the commercial stuff: in fact, it's probably more expensive.
From my point of view though, the extra expense is cancelled out by the fact that if it's made properly, your log roll really will last for years and years and a long time to boot. (Trust me, I'm an expert.)
(Oh dear! I've heard it all now an expert. Ha!)
If you want to make your own log roll, you’ll need the following materials.
The “log” bits are made from wood called “rail”.
This has the same “D” shaped profile as the roll that you buy and mine came from a local branch of Wickes builder’s merchants.
For making curves or shapes, you’ll need some lengths or a coil of strong wire.
This is nailed to the back of your roll with wire staples.
For straight lengths, it's best to screw or nail the "logs" to lengths of 2x1 timber.
Before assembly paint all the wood with preservative.
I use Wilkinson’s own brand called “Colour your garden” and I’ve found it to be excellent stuff.
I give the wood two coats, allowing the first to dry thoroughly before putting on the second coat and that's it.
All you need do now, is put it all together.
I won’t go into how you actually make the roll because I’m pretty certain that you’re all far better at d.i.y. than I am, but rest assured, if I can make log roll then so can you.


